Technical

Bringing up Baby

The trials, tribulations and ultimate triumph of building an award-winning Nieuport Baby SSDR biplane

I was quite happy flying AX3s at Popham. Popham, if you don’t know it, is a delightful airfield set in rolling Hampshire countryside. The landscape around it could satisfy a lifetime of low and slow summer evening flying, buzzing about over fields and streams, out over the scarp edge of Watership Down and above the valley beneath. If feeling brave, I might venture south, out over the blue waters of the Solent and across to the Isle of Wight. 

I was happy doing this until one day, there on the grass in front of the Popham café, appeared a thing of beauty: G-BUCO, an immaculate Pietenpol Aircamper built (I now know) by a gentleman called Alan James. Next to it my AX3 looked like, well, it looked like a flying tent. There was no choice. I had to get a better looking aeroplane. 

The UK’s Light Aircraft Association has a treasure trove of plans, particularly of the low and slow summer-evening variety of aeroplane. The problem was that the aircraft that I liked the look of – Currie Wot, Luton and Turbulent – were mostly wood and needed to be kept in a hangar. I could not see myself being able to find, let alone afford, an indoor hangarage near London. 

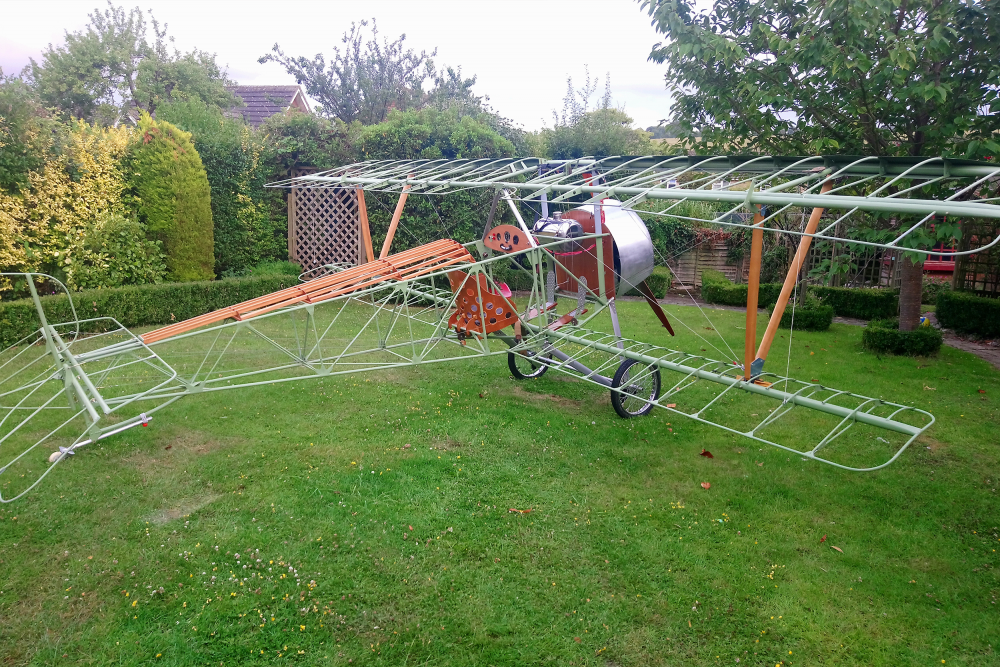
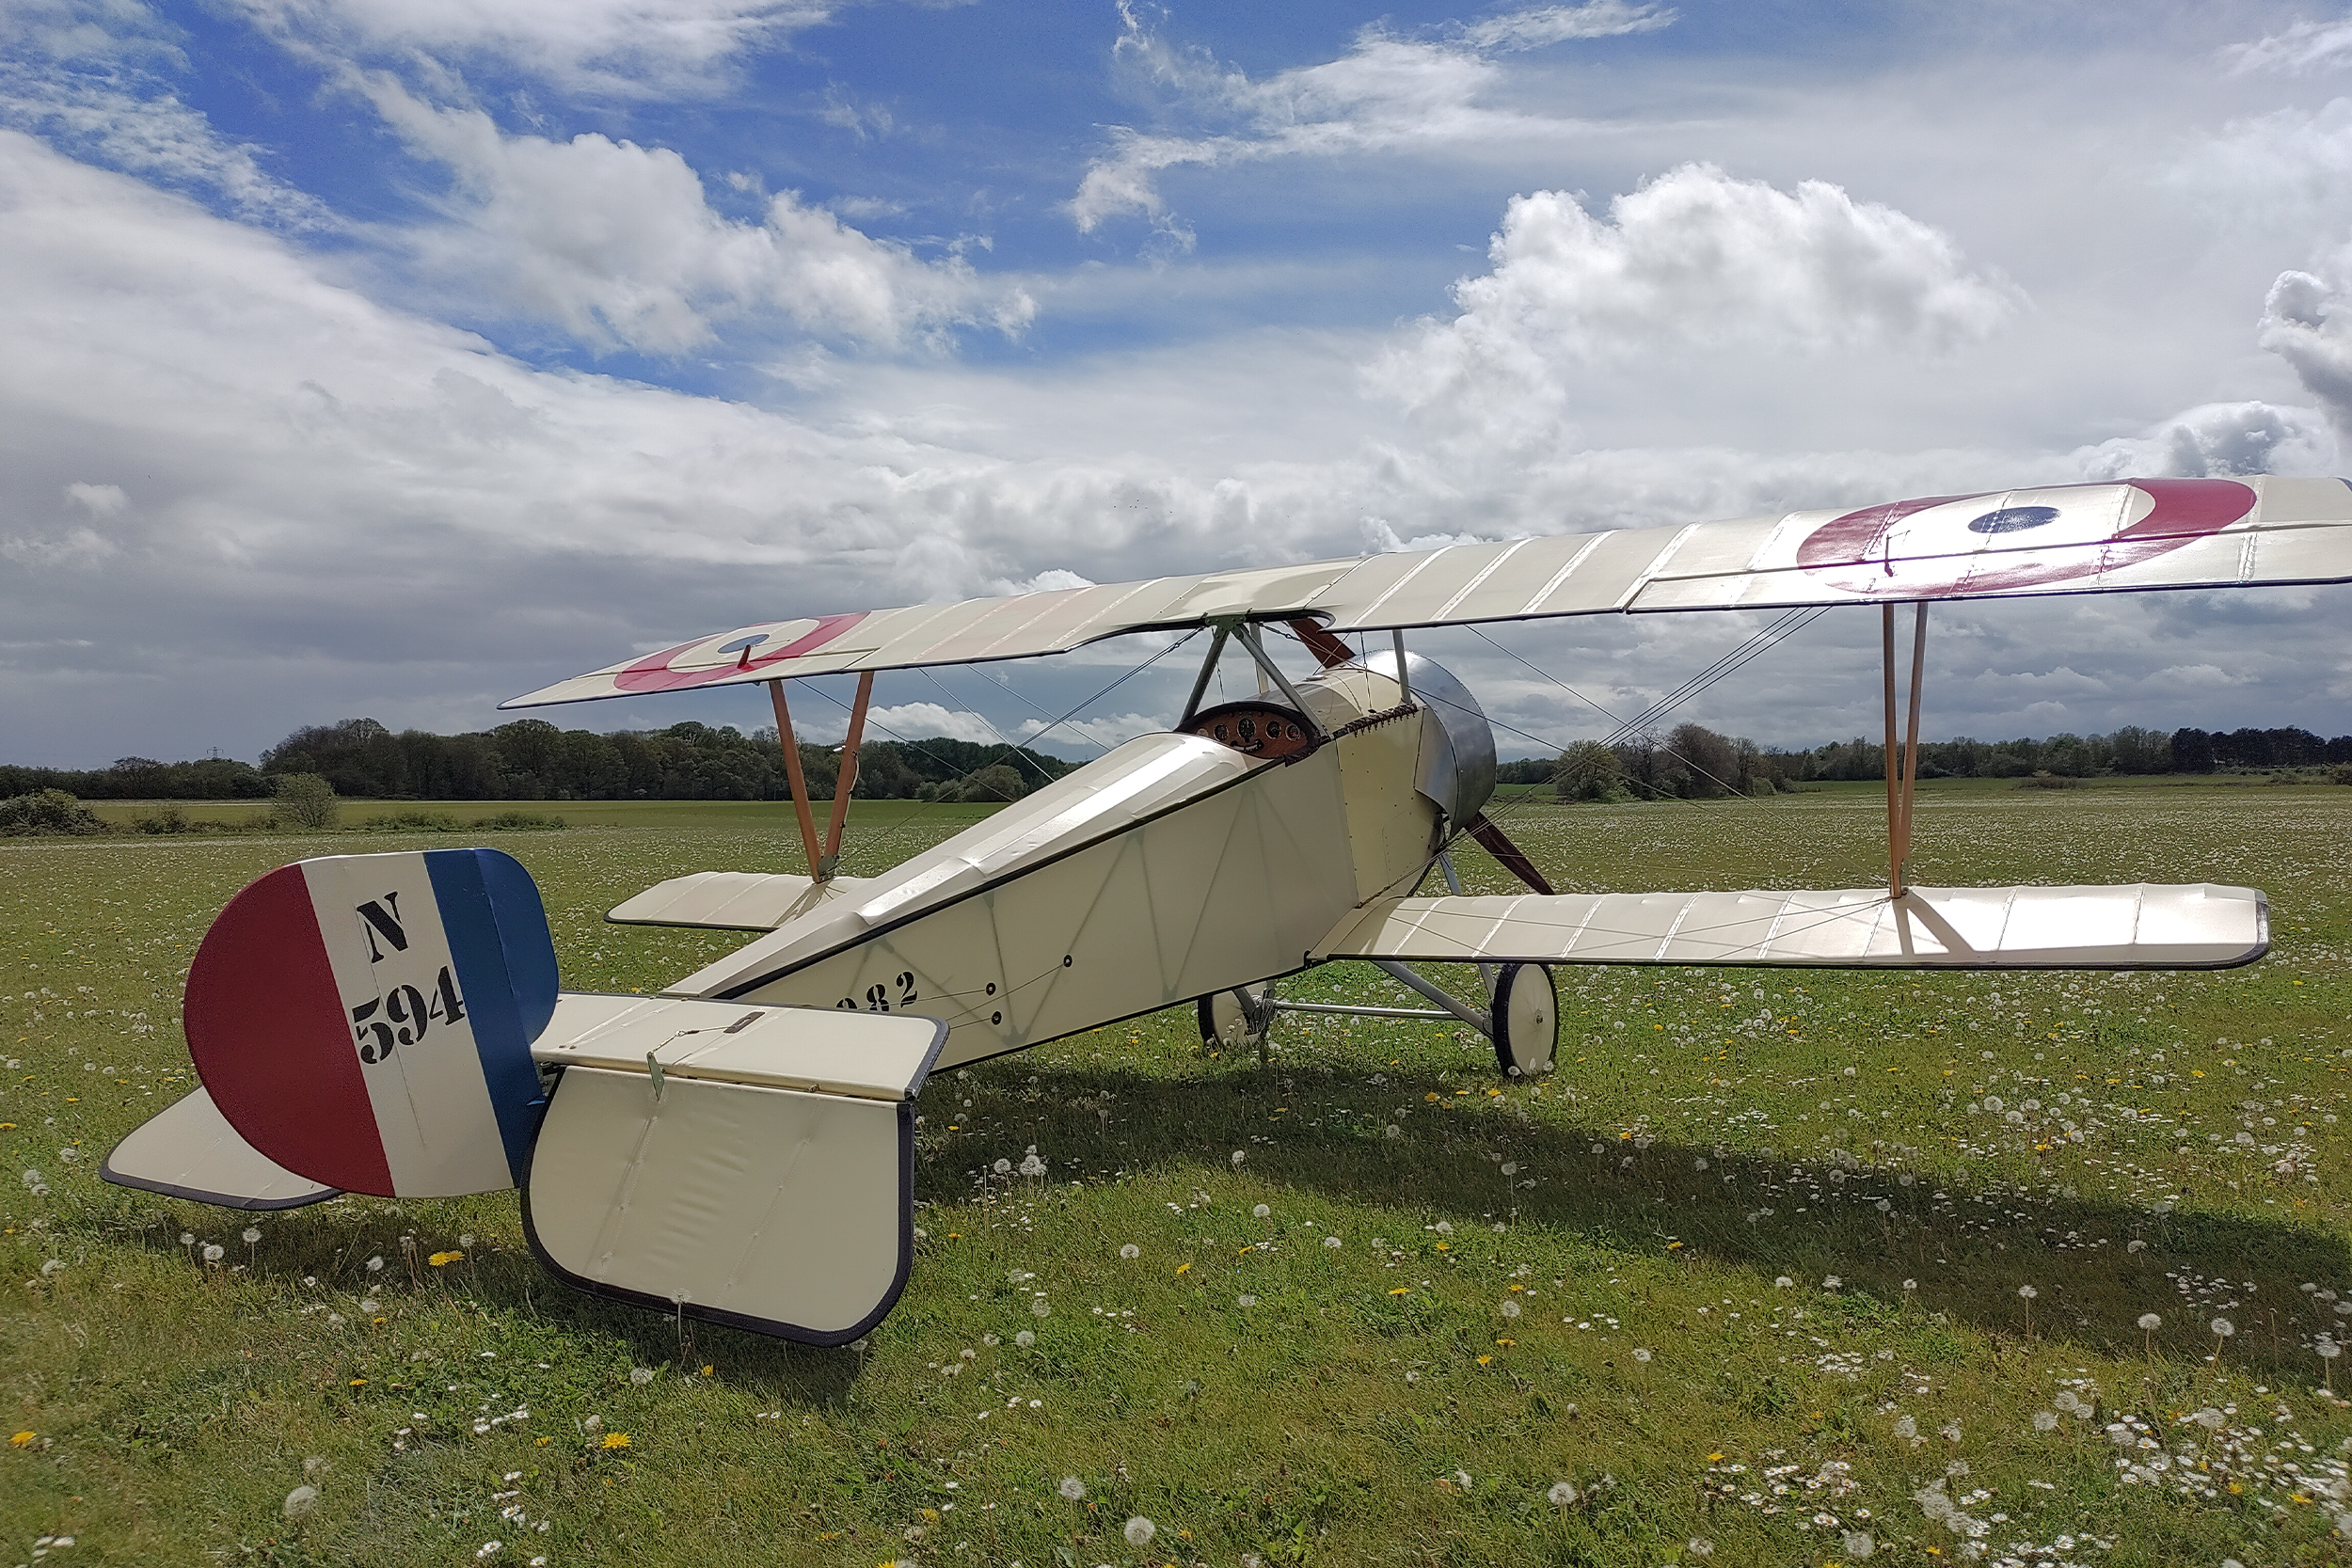
There was, however, a design being built extensively in the US which caught my eye: the Circa Nieuport. I have a particular weakness for anything that could be called a ‘flying machine’ rather than an aeroplane, and this almost perfectly scale replica of a Nieuport 11 (‘Bébé’) biplane falls close to that category. Particularly if one were to cover it in translucent doped linen and omit anything as war-like as a Lewis gun… 

As the design was made of aluminium tube, not wood, it would not mind being left out in the rain occasionally, at least during the summer. The only problem, and admittedly it was a pretty large one, was that it was not an approved design in the UK, so it could not be flown here. 

In April 2007, everything changed. The Civil Aviation Authority de-regulated single-seat microlight aircraft. I could build the Nieuport if the weight and stall speed fitted within the microlight category. 

The first thing I did was to send off for the plans from designer Graham Lee’s son. These arrived from Canada a week later. I was initially disappointed. 

Instead of beautiful draughtsman’s blueprints I received a photocopy of a handwritten and hand-sketched series of instructions. However, after reading through them, they were clear, easy to understand and talked the reader through each stage. Overall, it did not look too difficult. 

Finding a suitable engine was more of a challenge. The original had flown in the 1980s with a 25hp Cuyuna engine. No such thing existed 30 years later. 

Builders in the US had used a 36hp Volkswagen, an excellent engine, but too heavy if I was to keep the aircraft within the UK weight limits. The plans suggested a Rotax 447 as an alternative… these are no longer made. The 50hp Rotax 503 is available, but this was discounted in the plans as being too powerful. 

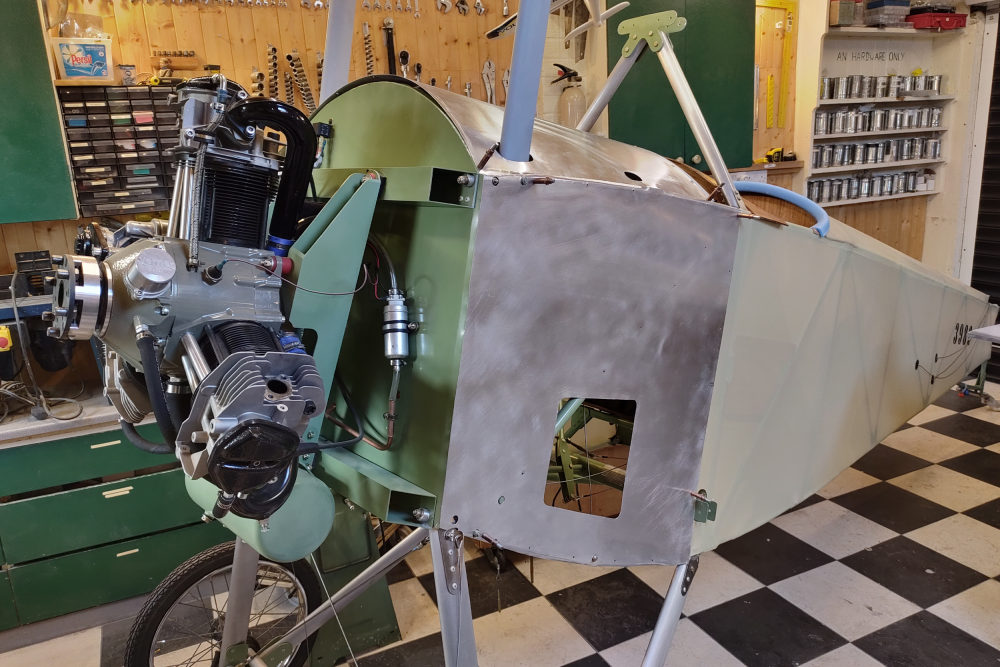
On the internet I had read about an engine called a Verner 3VW. With three cylinders, the empty weight was said to be only 36kg. It produced 36hp, or 42hp for take-off. Better still, it was a radial so it would look right – and a four stroke, so it would sound right. 

Learning to build

I needed to learn some aircraft building skills, so I signed up for two LAA courses. The first was about aluminium. In a Portacabin on a windswept and rainy airfield, I learned to use air tools to cut, shape and rivet aluminium, coming away from the day with an aluminium toolbox, and the realisation that I would need to buy a compressor. 

The woodworking course was hosted by LAA tutor Dudley Pattison at his house near Swindon. Duds is a famous name in the radio-controlled aircraft world as the founder of Flair models, and I had built some of his kits, so it was a bit of an honour to meet him. He had just completed an immaculate wooden Flitzer biplane. 

He taught us about glues, aircraft grade timber, making scarf joints and all the things one would need to build a wooden aircraft. But one particular piece of advice stuck in my memory – ‘move a bolt’. 

Building an aircraft is a very long and difficult project. With pressures of work and life, it is easy for progress to cease for long periods, or end altogether. The many unfinished aircraft projects advertised for sale are a testament to the difficulty that many builders come across in staying the course. 

Duds’ advice was simple, go into the workshop every day and do something. If nothing else, just ‘move a bolt’ from one hole to another. That way, you stay in the habit of working on the aircraft, and even if there are long periods when you do not have time to make any real progress, it always remains present in your mind.

First steps: building a rudder

As an experiment to see if I could actually do this thing, I ordered the materials for the rudder. These were various sizes of aluminium tube. The techniques for building a rudder are the same as are used in the rest of the aircraft, so this was a useful experiment. 

One Saturday morning, when I was home alone. I carefully cut a main spar tube to length, and filed the ends into a fish-mouth shape where it would meet the tubular frame that forms the outline of the rudder. 

That frame needed to be bent around a wooden former, so on a bandsaw I cut some scrap wood into a gentle curve, and screwed it firmly to the work surface. 

By clamping a long piece of the aluminium tube against this wooden former and pulling it around the bend, it was possible to bend the tube into the shape of the rudder outline, without the tube buckling. I slotted my spar into this frame, stood back and admired it.

Mounting the Verner 3VW engine and making the side panels for the forward fuselage

A couple of other tubes formed ribs, running from the front to the back of the rudder. To hold it all together, I cut diamond-shaped gussets from the thin aluminium sheet. These were easy to cut with scissors. 

One of these was clamped hard onto the spar and dented with a punch to form a dimple where the rivet would go. I then drilled a hole, and inserted a temporary rivet, called a ‘cleco’ to hold the parts hard together. The gusset was then folded over the outer edge of the frame and back onto the other side of the spar. More clamping, and I could drill and insert rivets to fix them together permanently. More of these gussets, and by the end of the day I had a rudder. It weighed less than my target weight. 

At this point my wife came to find me in the workshop. This was awkward. I had not yet discussed my idea of building an aircraft with my family. I had once built a kayak on the dining room table, which I now admit became something of an inconvenience. Worse still, my family had seen the fate of several radio controlled gliders. So I was concerned that the idea of me building an aircraft, and then flying in it, might not be encouraged. I had planned to introduce the idea gently, but now I was caught, red-handed, holding what was quite obviously a bit of an aeroplane. In retrospect I needn’t have worried, although she probably wondered why I couldn’t just watch sport on the TV like normal husbands… 

Ordering materials

With things looking positive on both technical and domestic fronts, I ordered the aluminium tubes and sheet for the whole airframe, along with nuts, bolts and rivets from Aircraft Spruce and Specialty. It was a few weeks before the call came, and the voice on the other end said, “Delivery from the United States for you. You’ll need to come and pay the duty and get it.” 

“How big is the package?” I asked. “Thirteen feet long,” he replied. “And you won’t be able to lift it.” 

I hadn’t thought of that. Thirteen feet in length wasn’t a problem, it could go on my roof rack. But how would I get it up there? 

“We’re not supposed to, but if you can come this afternoon, I can help you lift it on,” the voice added, kindly. I’d figure out how to get it off again when I got home. 

I took the afternoon off work and drove to the warehouse. I had imagined that I would need to collect the package at the airport and pay the customs duty there, but in fact the warehouse was in an industrial estate in Slough, some way from Heathrow. 

The warehouseman wheeled a long box out on a pallet truck. He and a colleague each took one end and assisted by a good degree of profanity lifted it onto the roof-rack. It was clearly heavy and a brief mental calculation showed why… about half of the aircraft weight was in that box. After paying, I strapped it down and drove cautiously home. It stayed on the roof rack on the driveway overnight. I figured the chances of it being stolen were fairly low.

The next morning, I persuaded my neighbour Glen to help me lift it down. Glen is a large New Zealander and, like so many of his countrymen, is particularly useful to have around when it comes to moving heavy things. He was to prove equally useful a week later when a courier company left a second-hand lathe in the middle of the driveway.

We lowered the box carefully onto a couple of dollies. Above it, I built sides and a top from an MDF sheet. This made a long, flat work table that could be pushed up against one wall of the workshop if needed, or wheeled into the centre so that I could get around each side. With the garage door shut, there was a foot spare at each end that I could squeeze around. After tearing my shirt doing this too quickly, I rounded off the corners of the table with a sanding block.

On the surface I started to measure out and draw the fuselage sides. This took quite a few evenings. 

Inevitably I would make mistakes, and have to rub parts out and start again, but eventually I had the fuselage drawn out, complete with verticals and diagonal bracing tubes. I cut scrap wood into small blocks which I screwed in at critical points to hold the tubing in the right place. Over the winter, I gradually laid out the fuselage sides, to be braced with tubes and held together with thin sheets and rivets. With work commitments I might manage a couple of these per week. Eventually I had two identical sides I could then join them with cross tubes. I now had a fuselage frame.

Wing spars

The lower wings on a Nieuport are quite narrow. The aircraft is more properly a sesquiplane than a biplane. They have a single main spar, with ribs slotted over it and riveted to it, and an external frame of thin tubing.

The spar is made of a 9ft tube that has been ‘ovalled’, ie, crushed so that it is no longer a round cross section, but is taller than it is wide. Doing this evenly required some ingenuity.

From a metals delivery website, I ordered two lengths of steel rectangular section tube, and a small size of square tube. The latter I cut into short lengths. Using a cheap arc welder, I welded these short lengths to the side of the longer tubes at six inch spacing, so that the coach bolts could pass through them and draw the two long tubes together, squashing anything between. 

I put the halves together with some thin strip wood between the steel and the aluminium, and tightened the nuts. It was a long and slow process to tighten 20 pairs of nuts along the length evenly so that the tube formed a consistent oval, but it worked, and I had two long oval wing spars. 

Ribs and more ribs

The wing ribs on the Circa Nieuport comprise a straight bottom piece of tube, and a curved upper piece. I needed 16 of them for the lower wings, and 24 for the upper. The plans called for yet more bending formers to be cut from scrap wood, and screwed down to the workbench. Once these were made, I could start to bend the ribs. I found it best to do these quickly, one after the other because then they tended to come out the same. If I took a break, the next ones would be very slightly different.

A Nieuport makes an arresting lawn ornament!

Assembling the wings was an enjoyable task, because now they started to take shape. I spread the components on the flat workbench, and slid the ribs over the spars. At each point where the ribs met the outer frame, the leading or trailing edge, I used a clamp to pull the frame hard against the rib before drilling and riveting another diagonal gusset around the joint to hold them firmly together. 

Working only occasional days here and there, the wings took another two years of patient work. Eventually, I had four wings. 

My next project will be a monoplane… 

Lockdown working

Verner Motors has a dealer in the UK based on an airfield near Selby, in Yorkshire, from where I could collect the engine. I was excited to see it as I had only seen pictures so far. I was impressed by how light it was. I could (just) pick it up and lift it with my hands. This was to prove useful later. Although I have an engine crane, I have to choose whether the crane or the fuselage is in my workshop at any one time. They won’t both fit. 

However, once it was in a crate, with accessories, I could no longer lift it. Glen, the New Zealand neighbour, was again to prove useful.

From here the pace of building started to pick up. The coronavirus pandemic confined me to working from home. This meant that I had an extra two hours per day when I was not commuting. I would get up early and get a couple of hours of work done on the aircraft before starting my day job. On occasion I took long conference calls from the workshop so I could file or shape components while listening to the call. On one occasion I forgot to put myself back on mute and my colleagues were treated to the sound of me filing a turtle deck stringer to length… 

As summer came, I moved the work onto the patio. To make the cowl, I made a former of thick pine, and gently hammered a sheet of soft aluminium onto the former to achieve the shape. To find out how, I watched YouTube videos and replicated how custom motorcycle makers shape mudguards. Although I found the slow and careful process of shrinking the metal to form the nose bowl restful, my wife observed that the neighbours were probably growing tired of the tap-tap-tap of metal bashing. So once the cowl was almost dimple-free, I finished it off on an English wheel.

On a glorious May bank holiday, stuck at home in full pandemic lockdown, I moved the entire aircraft out to be assembled on the lawn. With the engine installed, the fuselage was heavy and I nearly lost control of it as I wheeled it down the ramp onto the lawn. The aircraft ran away down the slope with me trying to slow it before it hit a cherry tree. That was very nearly its first crash. Eventually we had it fully assembled on the lawn. It looked so good that I didn’t want to cover it. 

See-through covering

I chose to cover the Nieuport in a translucent covering so that the structure of the aircraft is still visible, particularly when the sun shines through the fabric The original would have been covered in doped linen. I cheated and used ‘antique’ Oratex, a heat-shrink fabric that needs no doping. The process is similar to covering a model aeroplane in heat-shrink film.

Flying the nest

Eventually the day came when there was nothing more I could do at home. I arranged a couple of days off work and hired a large trailer. 

I set off shortly after dawn, carefully towing the trailer around the M25. Even though this was a pretty uncivilised hour of the day, cars were pulling alongside me to look at the aircraft, before waving and accelerating away. One even rolled down his window to film on his mobile phone. I suppose it is not every day that an aircraft drives around the M25. The next couple of days I spent assembling the aircraft, and adjusting the turnbuckles to get the angles of incidence correct. 

uport is challenging. Some of the Stow Maries WWI pilots had told me the way to turn is to apply full down elevator, full rudder, and a burst of power. 

This sounded like a good way to stand the aircraft on its nose but it worked. I was just about able to turn. I taxied up and down the airfield, gradually getting faster and faster, with the tail lifting. The wind was not straight up the runway, so on one occasion as the tail came back down, I felt it break away to the right, the right lower wingtip touched the ground and around we went. A good inspection showed nothing broken, but I fitted some fiberglass rods under the lower wings as tip draggers. They are not very authentic, but they will help save the covering while I learn.

Then, one evening as the sun was close to setting, I opened the throttle and let her run. The tail came up. There was a moment of calm as the bumping stopped and the air supported us. I thought for one glorious moment about letting the climb continue… but sense prevailed. I eased back on the throttle and the wheels touched again. We had flown!

Ahead lies lots of tweaking and trouble-shooting before I dare try leaving the ground for more than a second or two. But all too soon it was time to take it all apart again, to trailer up to Sywell for the Light Aircraft Association Rally and 75th Anniversary, where the Nieuport had a place in the homebuilders’ tent. I have never been to a rally before and it was an overwhelming experience. I spent three fascinating days meeting other builders and pilots and talking about building. I had written up my build in a short book, optimistically printing 200 copies: I had to start rationing these as they proved very popular. It is now on Amazon as The Biplane in the Garden.

The other displays in the tent were the front end of a Wright Flyer, a demonstration of blow moulding bubble canopies, a home-built seven cylinder radial engine, a full scale Avro 504, and Mr Alan James himself, builder of G-BUCO that started me down this route, showing us how to carve a propellor by hand. Just over the fence sat his latest gleaming project: a silver Isaacs Spitfire. Now there’s a thought…

In truth, my baby Nieuport looked small and basic next to these immaculate exhibits. But the judges must have liked it, because I was surprised and very flattered to be awarded the Albert Codling Trophy for the best part-completed aircraft.

The Nieuport fully assembled and looking very authentic at Damyns Hall, before taxi testing
Share

Leave a Reply

Share
Topics
  • 2
  • 3
Enjoy 3 Free articles OR Join today to enjoy unlimited access to all content
Join today

We use cookies to give you the best online experience. Please let us know if you agree to all of these cookies.